Gestures

ℹ️ On mobile devices currently the following hand gestures are available:

  • Control remote cursor ⇒ navigating with one finger
  • Left mouse click ⇒ single tap on the screen with one finger
  • Double mouse click ⇒ double tap on the screen with one finger
  • Right mouse click ⇒ tap and hold on the screen with one finger
  • Scroll up or down ⇒ swipe up or down with two fingers
  • Zoom in or zoom out ⇒ pinch to zoom in or out with two fingers

Note: Drag & drop is not yet available on mobile devices. Its implementation is on our to-do list, but unfortunately, we cannot tell you when it will become available.

Sending keystrokes

ℹ️ The Sending keystrokes feature, as the name indicates, allows you to send specific keystrokes to the remote device.

Depending on your needs, you can use the following options:


Sending a specific key combination

On the toolbar of the Screen app, click on the Sending keystrokes button:

In the window that appears, select the key combination to be sent:

After selecting the key combination, click on the Send button.

✅ By clicking on the Send button, the key combination will be sent to the remote device.

For example: CTRL + SHIFT + ESCAPE

Result: Sending the Ctrl + Shift + Esc key combination opens the Task Manager on the remote Windows system.


Sending a text entered in a text field to the remote device

On the toolbar of the Screen app, click on the Sending keystrokes button:

In the window that appears, you can enter (or paste) the text you want to send:

There are multiple ways to enter text:

  • Type it manually.
  • Paste text that you have previously copied to your clipboard. With one of the following methods:
    • On Windows: Ctrl + V
    • On Linux: Ctrl + V
    • On Mac: Command + V (⌘ + V)
    • Rightclick with the mouse, then select Paste
    • On mobile devices: long tap, then select Paste

Then click on the Send button.

✅ With this solution, the text is pasted into the remote device.

⚠️ Note: This function sends the text character by character to the remote device.


Sending the text from the local clipboard

ℹ️ This feature allows you to paste text copied to the local clipboard onto a remote device.

On the toolbar of the Screen app, click on the Sending keystrokes button:

In the window that appears, click on the Send local clipboard button:

✅ By clicking on the Send local clipboard button, the text previously copied to the clipboard will be pasted onto the remote device.

💡 Hint: You can use this function to fill in the password field during the remote login process (even if the clipboard is disabled). More info: Paste password

⚠️ Note: This function sends the text character by character to the remote device.

📧 If you have any questions or feedback regarding the functioning of this feature, please let us know at support@dwservice.net.

Paste password

ℹ️ Pasting is not allowed on the login screen of operating systems. Therefore, using the Copy and Paste functions of our service is not possible to paste the password for remote login.

✅ However, we have implemented a new feature that solves this problem. We will now show you how this feature works:

  1. Copy the password on your local clipboard using one of the following methods:
  • On Windows or Linux ⇒ select password, then press Ctrl + C
  • On Mac ⇒ select password, then press Command + C (⌘ + C)
  • Select password, mouse right-click, then select Copy
  • On mobile devices ⇒ Tap and hold, select password, then tap Copy

In the Screen application, in the toolbar, there is a Sending keystrokes button:

2. Clicking (tapping) on Sending keystrokes button will bring up a small window. 

3. Clicking (tapping) on the Send local clipboard button will paste the text on your local clipboard onto the remote device.

✅ This solution makes it possible to paste the password on the remote logon screen and easier to log in to the remote device. Especially if the password of the remote device is complex and/or long.


Alternative solution:

  1. Click on the Sending keystrokes button.
  2. Type in the password or paste it from your local clipboard.
  3. Then click on the Send button.

✅ With this method, the text in the input field will be entered on the remote device.

📧 If you have any feedback on how this feature works, we would love to hear from you at support@dwservice.net.

Paste (improved)

ℹ️ The Paste feature allows you to transfer content from the clipboard of your local device to the clipboard of the remote device.

Below you can see how this function works:

1. Place the desired content on the clipboard of your local device using one of the following methods:

  • On Windows ⇒ select content, then press Ctrl + C
  • On Linux (in graphical applications) ⇒ select content, then press Ctrl + C
  • On Linux (in terminal windows) ⇒ select content, then press Shift + Ctrl + C
  • On Mac ⇒ select content, then press Command + C (⌘ + C)
  • Select content, mouse right-click, then select Copy
  • On mobile devices ⇒ Tap and hold, select content, then tap Copy

2. Click (tap) on the Send to remote clipboard button on the Screen application toolbar: 

A window will appear:

3. Here, use one of the methods used for pasting:

  • On Windows ⇒ Ctrl + V
  • On Linux ⇒ Ctrl + V
  • On Mac ⇒ Command + V (⌘ + V)
  • Right-click, then Paste
  • On mobile devices ⇒ Tap and hold, then tap Paste

As a result, the content on your local clipboard has been moved to the remote device’s clipboard.

4. You can paste the content into the desired location on the remote device using one of the following methods:

  • On Windows ⇒ Ctrl + V
  • On Linux (in graphical applications) ⇒ Ctrl + V
  • On Linux (in terminal windows) ⇒ Shift + Ctrl + V
  • On Mac ⇒ Command + V (⌘ + V)
  • Mouse right-click, then select Paste
  • On mobile devices ⇒ Tap and hold, then tap Paste

📧 If you have any questions or feedback regarding the functioning of this feature, please let us know at support@dwservice.net.

Copy (improved)

ℹ️ The Copy feature allows you to transfer content from the clipboard of the remote device to the clipboard of your local device.

Below you can see how this function works:

1. Place the desired content on the clipboard of the remote device using one of the following methods:

  • On Windows ⇒ select content, then press Ctrl + C
  • On Linux (in graphical applications) ⇒ select content, then press Ctrl + C
  • On Linux (in terminal windows) ⇒ select content, then press Shift + Ctrl + C
  • On Mac ⇒ select content, then press Command + C (⌘ + C)
  • Select content, mouse right-click, then select Copy
  • On mobile devices ⇒ Tap and hold, select content, then tap Copy

2. Click (tap) on the Receive from remote clipboard button on the Screen application toolbar: 

A window will appear:

3. Here, use one of the methods used for copying:

  • On Windows ⇒ Ctrl + C
  • On Linux ⇒ Ctrl + C
  • On Mac ⇒ Command + C (⌘ + C)
  • Mouse right-click, then select Copy
  • On mobile devices ⇒ Tap and hold, then tap Copy

As a result, the content on the remote device’s clipboard has been moved to your local clipboard.

4. Now you can paste it into the desired location on your local device using one of the following methods:

  • On Windows ⇒ Ctrl + V
  • On Linux (in graphical applications) ⇒ Ctrl + V
  • On Linux (in terminal windows) ⇒ Shift + Ctrl + V
  • On Mac ⇒ Command + V (⌘ + V)
  • Mouse right-click, then select Paste
  • On mobile devices ⇒ Tap and hold, then tap Paste

📧 If you have any questions or feedback regarding the functioning of this feature, please let us know at support@dwservice.net.

How to request a refund?

ℹ️ Our subscriptions and invoicing are handled by our reseller partner (Paddle – The complete payments, tax, and subscriptions solution for SaaS), so you should contact them in this case. You can do this as follows:

➡️ Go to support website of our reseller partner: Paddle.net

1. Click on the Look up my purchase button.

You will see the following window:

2. Enter your e-mail address.
3. Tick the “Verify you are human” checkbox.
4. Click on the Locate my purchase button.

You will see the following:

Check your mailbox. You will receive an email to your email address:

5. Click on the Verify and show purchases button.

A web page will open with the details of your subscription:

6.  Click on the “Get Help” button.

A chat window will appear:


7. At the bottom of the chat window, you can request a refund.

➡️ In case you encounter any problems during the process, please contact us at support@dwservice.net with the details of your problem.

⌛ When launching the Screen app: Loading…

ℹ️ There may be various reasons for this problem. Both on the Agent side and on the Client (web browser) side.

To find the problem, we suggest checking the following:

1️⃣ Check whether the error occurs with only one agent or with several.

2️⃣ Check the log files of the Agent. You can read about log files here: Log files

3️⃣ If possible, try using a different network/Internet connection (for example: using tethering, mobile connection).

4️⃣ Use a different web browser. For example: Safari (in case of mac devices), Microsoft Edge, Google Chrome, Mozilla Firefox, Brave, etc. Check if the problem occurs with another web browser as well.

5️⃣ If your web browser has extensions/plugins, please temporarily disable all of them. If the error does not occur without extensions/plugins, enable them one by one. After each enablement, check whether the Screen application continues to function properly. This will allow you to find out which extension/plugin caused the problem.

6️⃣ When you encounter the problem, check your browser console for errors:

  • For Chromiumbased web browsers (for example: Microsoft Edge, Google Chrome, Brave, etc.) and Mozilla Firefox, rightclick and select Inspect from the menu that appears.

In the DevTools window that opens, select the Console tab.

Note: In most of the web browsers, you can also use the F12 function key to open DevTools.

Check for errors (if any).

  • If you are using a Safari browser and the problem appears, from the Develop menu, select Show Web Inspector and then the Console tab in the window that appears.

In case you do not have a Develop menu in your Safari browser, proceed as follows:
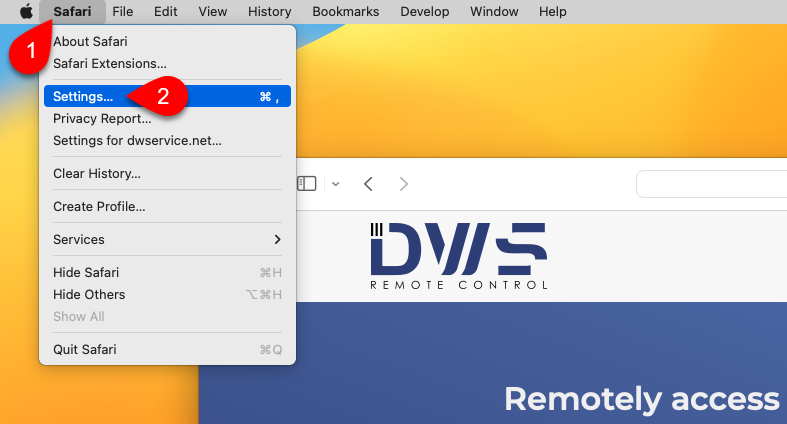
1. Select Safari.
2. Select Settings…

The following window will open:
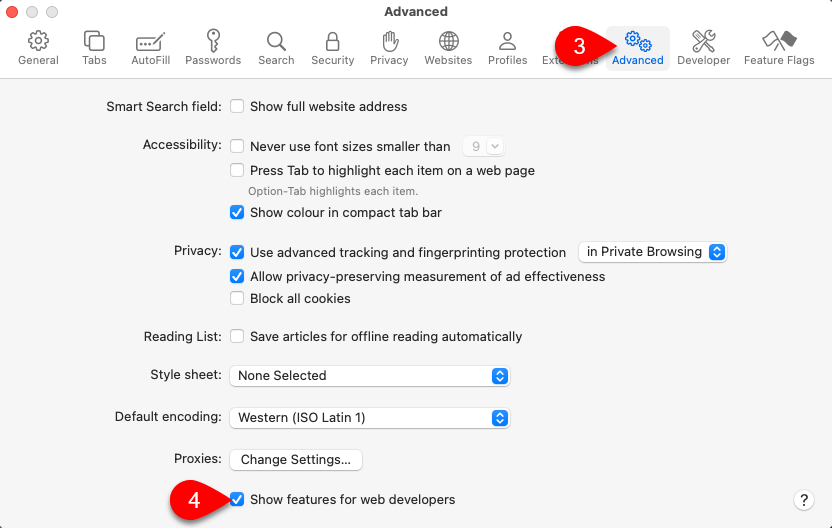
3. Select Advanced.
4. Tick the checkbox before the Show features for web developers.
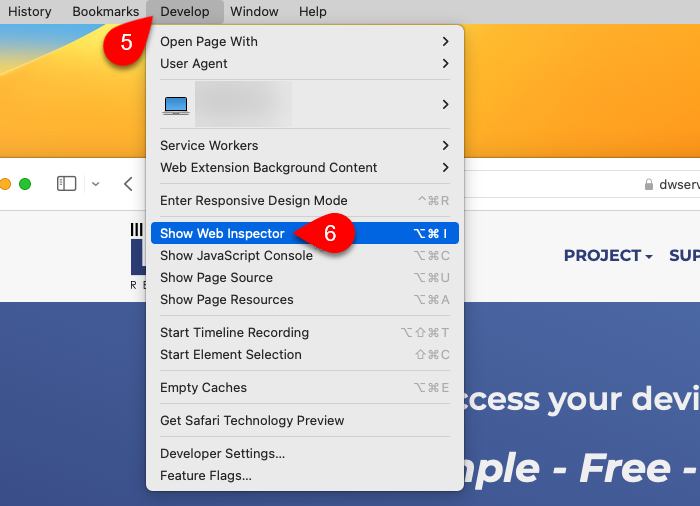
5. Select Develop.
6. Select Show Web Inspector.

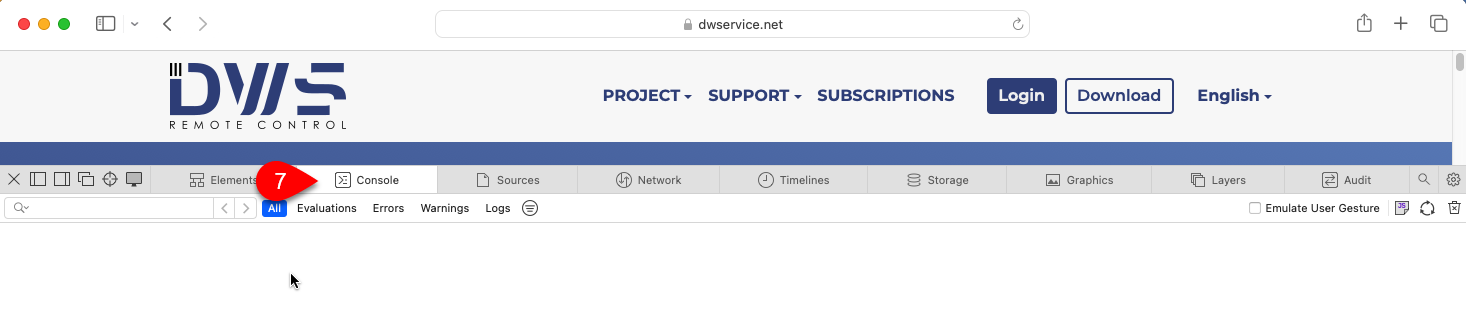
7. Select Console tab.
Check for errors (if any).

7️⃣ You can also search for errors in the operating system logs:

  • Windows ⇒ Using the Windows Event Viewer.
  • Linux ⇒ You can check for errors by running the dmesg command. Execute the dmesg command in a Terminal window:
    • To display errors related to dwagent, enter this command: sudo dmesg | grep dwagent
    • To display errors related to python, enter this command: sudo dmesg | grep python
  • macOS ⇒ Using the Consol application of the macOS system. (View log messages in Console on Mac – Apple Support)

8️⃣ If you have any Antivirus/Firewall protection, please temporarily disable them and check if the remote control is working properly.

📧 If your problem persists, please share with us the details (for example: the exact version of your operating systems, the version of your web browser, any error messages, dwagent.log file, etc.) at support@dwservice.net.

🕶️ Using dark mode in your web browser

ℹ️ Implementing dark mode is on our todo list, but unfortunately, we cannot provide a date for when it will be available.

➡️ In the meantime, as a workaround, we suggest you use the following web browser extension: Dark Reader

With the web browser extension mentioned above, you can use dark mode on our website.

💡 Hint: If you use a mobile device, Microsoft Edge or Firefox web browsers also support extensions, so dark mode is available on mobile devices as well.

❗Error: #PermissionRejected

ℹ️ This error message may appear if remote devices are running a Linux operating system and using Wayland. Wayland requires a permission to be granted.

Depending on the desktop environment of the remote device, the situation is as follows:


Gnome desktop environment

If a connection is made to the remote device and permission has not been granted previously, the following message will appear in the Screen app:

Meanwhile, a window will appear on the remote device’s screen:

To grant permission, click on the Share button:

✅ By using the Share button, you grant permission, and from now on, remote control will work.

If you click on the Cancel button, permission will be rejected:

And then the “Error: #Permission Rejected” error message will appear in the Screen app.

✅ To avoid the error message and ensure successful remote control, use the Share button to grant permission for remote control.


KDE Plasma desktop environment

If a connection is made to the remote device and permission has not been granted previously, the following message will appear in the Screen app:

Meanwhile, a window will appear on the remote device’s screen:

To grant permission, click on the Share button:

✅ By using the Share button, you grant permission, and from now on, remote control will work.

If you click on the Cancel button or close the window, permission will be rejected:

And then the “Error: #Permission Rejected” error message will appear in the Screen app.

✅ To avoid the error message and ensure successful remote control, use the Share button to grant permission for remote control.


Commercial use

ℹ️ By default, all features of our service are available FREE OF CHARGE FOR EVERYONE. And not only for individuals, but also for the following:

  • companies
  • businesses
  • enterprises
  • organizations
  • foundations
  • public entities
  • public authorities
  • institutions
  • etc.

Absolutely for everyone.

All features of our service can be used for FREE with a maximum bandwidth of 6 Mbps. This is sufficient to access and manage a remote device (assuming properly functioning devices and internet connections).

The only limitation for free usage is the bandwidth. If you need a higher bandwidth (or you would support our project), one of our subscription plans may be a solution for you.

📖 You can find information about subscription plans here: DWService – Subscriptions

There are several subscription plans to choose from. The difference is the bandwidth (and the price).

📖 And you can read about the role and importance of subscriptions here: DWService – About Us
▶️ You can watch our tutorial video about the subscription on our YouTube channel: DWService – How to subscribe (if you decide to) – YouTube

💡 If you subscribe to one of our plans and you find it insufficient, you can switch to a larger plan at any time.

ℹ️ Bandwidth refers to a session between the Client (web browser) and the Agent. In other words, per session.
⚠️ But it is important to mention that the bandwidth we can guarantee depends on the Node and the numbers of users connected at the same time too.

An example: if you choose the Entry subscription plan, the maximum connection speed will be 8 Mbps, which is 1 MB per second. That means you can download or upload a maximum of 1 MB of data per second to the remote device.

➡️ We suggest that you first test how our FREE service performs for you. If it is not sufficient, test the higher speed with one of the smaller monthly subscription plans. If that is not sufficient either, switch to a larger subscription plan.
You can switch to a larger plan at any time and more than once (if you need to). This way you can select the subscription plan that suits you best.