Agent

The Agent is a small piece of software that can be downloaded from our website (https://www.dwservice.net/download.html) and installed on the device you want to access remotely. The Agent allows you to connect to the device remotely. The Agent must be running on the remote device for remote access to work. The Agents are available for multiple operating systems, which are the following:

After downloading and opening the Agent file, in the window that appears you can choose from the following:

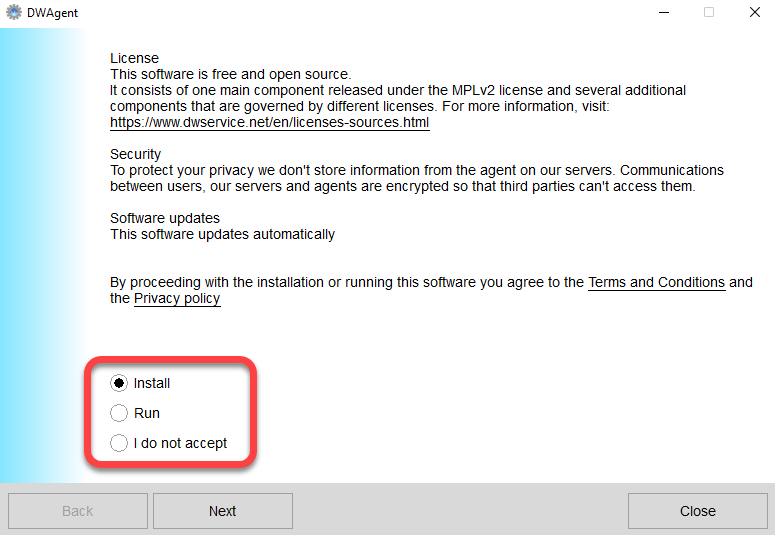
  • Install (Install the Agent): by selecting this option you can install the Agent on the device. Once installed, the Agent runs continuously in the background on the device and allows you to connect.
  • Run (Run the Agent): If you select this option, the Agent will create a session that will only be active if the window is open. When the window is closed, the session is terminated. Selecting the Run option allows you to connect to the device only as long as the window is open, and the session is active.

Related articles: Download, Run the Agent

Watch our tutorial video on How to download the Agent:

Watch our tutorial video on How to run the Agent:

Watch our tutorial video on How to install the Agent with code (Windows):

Watch our tutorial video on How to install the Agent with credentials (Windows):

Watch our tutorial video on How to install the Agent (Linux):

Watch our tutorial video on How to install the Agent (MacOS):

Basic definitions (alphabetical order)

📖 This section contains explanations of words and phrases related to our service.
🔤 Words and phrases are ordered alphabetically to make them easier to find.

🗑️ How do I manually remove the agent on a Windows?

The easiest way to remove manually the agent on Windows is by stopping and remove service and deleting its files and folder.
Open a new Command window as Administrator and execute the following commands:

  1. Stop the DWAgent service:
    sc stop DWAgent
  2. Delete the DWAgent service:
    sc delete DWAgent
  3. Stop the dwagent.exe task:
    taskkill /f /im dwagent.exe
  4. Remove the DWAgent folder:
    rmdir /s /q "C:\Program Files\DWAgent"
    ⚠️ If the Agent is not installed in the default location, enter the current installation path instead of C:\Program Files\DWAgent“.
  5. Remove the key from the registry:
    reg delete "HKEY_LOCAL_MACHINE\SOFTWARE\Microsoft\Windows\CurrentVersion\Uninstall\DWAgent" /f
  6. Remove DWAgent entry from Windows menu:
    rmdir /s /q "C:\ProgramData\Microsoft\Windows\Start Menu\Programs\DWAgent"

💡 Alternatively, you can create a batch file (for example: dwagent_uninstall.bat) that contains all of the above commands and performs the removal of the Agent from the Windows system with one command. Using this method, do the following:

  1. Create a plain text file and name it for example dwagent_uninstall.bat.
  2. Copy and Paste the following commands into the dwagent_uninstall.bat:
    ⚠️ If the Agent is not installed in the default location, enter the current installation path instead of “C:\Program Files\DWAgent”.

@echo off
sc stop DWAgent
sc delete DWAgent
taskkill /f /im dwagent.exe
rmdir /s /q "C:\Program Files\DWAgent"
reg delete "HKEY_LOCAL_MACHINE\SOFTWARE\Microsoft\Windows\CurrentVersion\Uninstall\DWAgent" /f
rmdir /s /q "C:\ProgramData\Microsoft\Windows\Start Menu\Programs\DWAgent"

3. Save the file.
4. Execute dwagent_uninstall.bat using one of the following methods:

  • Open the command prompt as Administrator and run dwagent_uninstall.bat.
  • Right-click on the dwagent_uninstall.bat file and from the menu that appears, select Run as Administrator.

🗑️ How do I manually remove the agent on a Linux?

The easiest way to remove manually the agent on Linux is by stopping and remove service and deleting its files and folder.
Open a new Terminal window and execute the following commands:

  1. Stop the DWAgent service:
    sudo /usr/share/dwagent/native/dwagsvc stop
  2. Delete the DWAgent service:
    sudo /usr/share/dwagent/native/dwagsvc delete
  3. Remove the DWAgent folder:
    sudo rm -r -f /usr/share/dwagent
  4. Remove the dwagent file:
    sudo rm -f /etc/dwagent
  5. Remove the dwagent_systray.desktop file
    sudo rm -f /etc/xdg/autostart/dwagent_systray.desktop
  6. Restart Linux.

💡 Alternatively, you can create a script file (for example: dwagent_uninstall.sh) that contains all of the above commands and performs the removal of the Agent from the Linux system with one command. Using this method, do the following:

  1. Create a plain text file and name it for example dwagent_uninstall.sh
  2. Copy and Paste the following commands into the dwagent_uninstall.sh:
    ⚠️ If the Agent is not installed in the default location, enter the current installation path instead of “/usr/share/dwagent”.

#!/bin/sh
/usr/share/dwagent/native/dwagsvc stop
/usr/share/dwagent/native/dwagsvc delete
rm -r -f /usr/share/dwagent
rm -f /etc/dwagent
rm -f /etc/xdg/autostart/dwagent_systray.desktop

3. Save the file.
4. Execute dwagent_uninstall.sh using the following command:

sudo bash dwagent_uninstall.sh

5. Restart Linux.

How do I reinstall the agent?

If for some reasons, you need to reinstall the agent. Please follow the steps below.

First log in to you www.dwservice.net account and identify the agent that you have previously configured that you want to reinstall.

Click on the three vertical dots to get access to several option and choose Reinstall

It will generate a new installation code.

Then go on the machine and in the DWagent interface click on Configure agent than choose next.

You will get an option to change the installation code

After that screen confirm that you intend to reinstall the agent

Then enter the new code that you generated in the first step from www.dwservice.net

How to remove the agent?

In order to remove the agent, open the DWAgent interface and click on the uninstall button as shown below.

Can I use one DWService account for several users?

No, the account is personal, so only one user at a time can be connected to the account. If you need to have agents controlled by more users, you must use Shares.

Example:
Let’s take the case of a company with one server and two users who need control it. We recommend using 3 DWService accounts:

  • main@company.com – Use this account to configure, set up and install the agent on the server (and other company PCs) and eventually register a premium subscription with this account.
  • user1@company.com
  • user2@company.com

main@company.com can share the agent with the other users. Extra bandwith from a premium account will also be shared with the other free accounts.

Read more about sharing and premium subscriptions.

I set up 2FA but I lost my recovery code

If you have set up 2FA by activating TOTP with an app on your smartphone and then lost access to your smartphone you need to log in with the recovery code that was generated when you first activated TOTP.

If you lost access to this recovery code, we may not recover your account information. You need to create a new account with a different email address.

How to set up 2FA with a new smartphone?

If you have enabled TOTP and need to switch to a new smartphone, first log in DWService either with :

  • Your old smartphone
  • The recovery code you received when setting up TOTP with your old smartphone

Go to your account information and disable TOTP

Download on your new smartphone an app TOTP app. Among available applications for iOS or Android, you’ll find FreeOTP, Google Authenticator (Android – iOS), Microsoft Authenticator or Authy. This is a non-exhaustive list ; you can find other similar apps in the Apple App Store or in the Google Play Store.

Reset TOTP on your new smartphone by following the normal steps as explained here. It will generate a new recovery code that you MUST keep.

How to configure a proxy?

In order to configure a proxy open the agent and click on Configure

Choose the second option, Configure a proxy

Choose the type of proxy you want to set up.

Here is how Wikipedia explains the difference between a HTTP and a SOCKS proxy.

SOCKS
If Bill, or any client for that matter, wishes to communicate with Chris over the internet, but a firewall between them exists on his network, where Bill is not authorized to communicate with Chris directly. So, Bill connects to the SOCKS proxy on his network, informing it about the connection he wishes to make to Chris; the SOCKS proxy opens a connection through the firewall and facilitates the communication between Bill and Chris.

HTTP
Bill wishes to download a web page from Jane, who runs a web server. Bill cannot directly connect to Jane’s server, as a firewall has been put in place on his network. In order to communicate with the server, Bill connects to his network’s HTTP proxy. His web browser communicates with the proxy in exactly the same way that it would directly with Jane’s server if that were possible; that is, it sends a standard HTTP request header. The HTTP proxy connects to Jane’s server, and then transmits back to Bill any data that Jane’s server returns.

Enter your proxy information on the next screen